History/Background | The Barn Begins... | More of the Barn | Finished with the Barn! | Farmall 560 | Other Tractor Pics | Under Contruction | Contact Me

Home

Building a Barn
The Barn Begins...

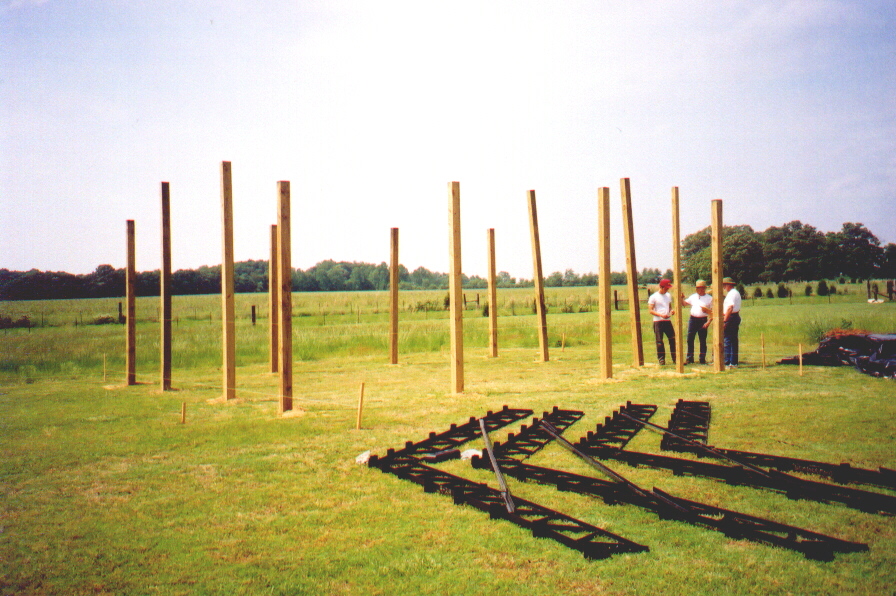
A couple of Saturdays before everyone came up to help, my wife helped me stake out the site where the barn would lay.  We had picked up some string and measured off 24x30 and tied the string to the stakes that we had driven in the ground.  Then we measured the X in the middle to make sure our two hypotenuse were the same.  We adjusted our stakes to make sure they were equal...or so we thought.  I placed a 1"x1" stake at every spot that I would need to dig holes for the 6"x 6" pressure treated post.  (They are actually 5.5"x 5.5".) 
 
The Saturday before my wife's family came up from Florida, my Dad, brother and a friend came over and we dug the holes for the post to sit in.  I went to town early and rented a 3 pt. auger from the rental place for around $35.  Dad brought the Kubota over and we started digging.  Renting the post hole digger was definitely worth the money.  We had 12 holes to dig and it didn't take but an hour or so.  The stakes I had driven were used as a reference for the auger tip.  The tip would be placed where the stake had left a hole in the ground when removed.  (I measured and drove the stakes that way on purpose)  We dropped in the post as soon as we'd lift the auger from the hole. 
 
Our first problem arose when we started digging and I didn't double check my initial measurements until AFTER we finished digging all 12 holes.  I assured my helpers the holes were layed out perfectly so we just kept digging.  Our corners were a little out of square.  Ok, 7" out!!  How did that happen?  Still not sure, but it didn't take long to find the wall that was out of square and move a few post around.  Of course we had to do some hand digging though.  It was all part of the education process.  Next time, I'll dig a hole, then measure, dig another, measure again. 
 
In case you are wondering, I didn't use any concrete in the holes.  This hard Alabama red clay is just that, hard (just add water). 

pole1.jpg

My wife's family from Florida got here late Saturday night.   This was Sunday afternoon.  Here you can see a few post that we had to move out in order to get a good square.  We also bolted the 4 trusses together.  We hit the ground running on Monday morning.  The forecast all week was for rain Mon. - Wednesday.  Lots of it!  What timing.  My help was here for one week, I was only off for one week.  We'd just have to make the most of our time while it wasn't raining. 
You can see the trusses here.  I ordered them special with a 5/12 pitch.  You can see the cross braces that span the two sections that make up one truss. 

sideframe.jpg

Monday morning:  Dad and I ran to town and picked up 2 sets of scaffolding.  As you can see the clouds have rolled in.  We got out early around 7 am.  From left to right, that's me; Father in law, David; Brother in law, Robert; David's brother, 'Uncle Jim'; and my Dad, Mike. 
We started off by putting the side perlins (2"x6" boards) on the post.  Uncle Jim is holding one on ready to be nailed.  I elected to space them 2' apart for the first 2 rungs of boards and then 3' for the upper rung.  The bottom rung is pressure treated.  We also used a string level to cut the tops of our post level.  We did this very carefully using a skill saw cutting all the way around the post and then knocking it off with a 3 lb. hammer. 

truss.jpg

Monday early afternoon we had all but the very top rung of side perlins in place, we'd hold off on those till we got the trusses up.  We were ready to heave the trusses into place.  They are heavy!  So here was the plan:  we'd place the scaffolding in the middle with two persons standing on that.  Whoever was not on the scaffolding would be on either side of the barn and we'd "walk" the trusses up until we could place them on top of the post to place the bolt through the truss and post. Then we'd bolt it up tight.  Until we could get another truss up to link the 2 together with a couple of perlins (or rafters) it was kind of scary having it support itself, even if it was for just a few minutes.  On top of that, the wind was really starting to pick up because of the rain and thunderstorms that were approaching.  Needless to say, I'd be releived once we had the trusses all up and the roof perlins (also 2"x6" boards) in place!    

rain.jpg

Well, we had all 4 trusses up and minimally secured to each other by nailing approximately 2 perlins between 2 trusses and the rain then began to fall.  I was glad we had them all up at least.  The rain came that afternoon with high winds and lasted all night long until mid morning Tuesday with lots of lightning and thundering...some parts of the county even had tornado warnings.  I was in hopes all night that those trusses wouldn't blow over.  When one truss moved the others moved too because of the way they were connected without any roof on it. 
I think we recieved about 5 inches of rain overnight.  You can see in the picture how high the water was in the ditch out front by the driveway Tuesday morning.  It actually flooded our front yard.  Fortunately we had covered all of the tools and lumber Monday afternoon very well; some of the bottom boards and tools that were on the ground under the plastic still got wet but everything was still there when work resumed Tuesday afternoon.  The trusses swayed back and forth through the night but they held! 

More of the Barn